网络世界就像一个活生生的变形有机体,永远不会停止进化。用户行…
评论允许用户使用您网站上的内容。因此,我们认为对您的评论布局和评论表单进行样式设置很重要,因此它既易于使用,又美观。最近,一个用户问我们如何将jQuery工具提示添加到WordPress注释表单中。我们认为其他人也可能会觉得这很有用。在本教程中,我们将向您展示如何以WordPress注释形式添加jQuery工具提示。
为什么要添加jQuery工具提示?
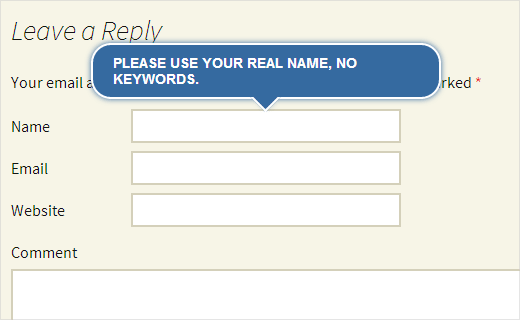
当用户将鼠标移至某个项目时,会显示工具提示,通常会向他们提供有关该特定项目的描述。在本教程中,我们将添加jQuery工具提示以显示提示,例如,请在注释表单字段中使用您的真实姓名。
通过添加jQuery工具提示,您可以增强用户体验,并且看起来会更好。
如何添加jQuery工具提示
首先,您需要在桌面上创建一个文件夹并将其命名wpb-comment-tooltips。在此文件夹中,您需要创建以下三个文件:
- wpb-comment-tooltips.php
- wpb-tooltip.css
- wpb-tooltip.js
使用记事本之类的纯文本编辑器来创建这些文件。创建文件后,需要wpb-comment-tooltip.php在文本编辑器中打开。将此代码复制并粘贴到文件中:
<?php/** Plugin Name: WPBeginner's Comment Form Tool TipsDescription: A jQuery powered comment form tool tips plugin based on a tutorial by WPBeginnerVersion: 1.0Author: WPBeginnerAuthor URI: https://www.wpbeginner.comLicense: GPL2*/
// Only load our scripts and style when a comment form is displayed
add_action( 'comment_form_before', 'wpb_comment_tooltips');
functionwpb_comment_tooltips() { wp_enqueue_script('wpb-tooltip-jquery', plugins_url('/wpb-tooltip.js', __FILE__), array('jquery-ui-tooltip'), '', true);wp_enqueue_style('wpb-tooltip-css', plugins_url('/wpb-tooltip.css', __FILE__), false, null);}
// Modify comment form fields and add title attribute to form input fields functionalter_comment_form_fields($fields){ $fields['email'] = '<p class="comment-form-email"><label for="email">'. __( 'Email', 'twentythirteen') . '</label> '. ( $req? '<span class="required">*</span>': '') . '<input id="email" title="Your email is safe with us, see our privacy policy." name="email" type="text" value="'. esc_attr( $commenter['comment_author_email'] ) . '" size="30"'. $aria_req. ' /></p>'; $fields['url'] = '<p class="comment-form-url"><label for="url">'. __( 'Website', 'twentythirteen') . '</label>'. '<input id="url" name="url" title="Your website or any social media profile URL" type="text" value="'. esc_attr( $commenter['comment_author_url'] ) . '" size="30" /></p>'; $fields['author'] = '<p class="comment-form-author">'. '<label for="author">'. __( 'Name', 'twentythirteen') . '</label> '. ( $req? '<span class="required">*</span>': '') . '<input id="author" title="Please use your real name, no keywords." name="author" type="text" value="'. esc_attr( $commenter['comment_author'] ) . '" size="30"'. $aria_req. ' /></p>'; return$fields;}add_filter('comment_form_default_fields','alter_comment_form_fields');?>
在上面的代码中,我们首先创建了一个插件标头,为其指定了名称和描述。之后,我们加载JavaScript和CSS文件(请参阅有关如何在WordPress中添加JavaScript和样式的指南)。
我们还确保仅在显示注释表单时才加载这些文件。之后,我们修改了默认注释表单,并在输入字段中添加了title属性。此标题属性包含我们希望在工具提示中显示的消息。例如,在作者字段中,我们使用了:
title="Please use your real name, no keywords."
现在,您已经创建了插件文件,是时候添加一些jQuery。打开wpb-tooltip.js文件并在其中添加以下代码:
(function($) {$( "#commentform").tooltip({ position: { my: "center bottom-10", at: "center top", using: function( position, feedback ) { $( this).css( position ); $( "<div>") .addClass( "arrow") .addClass( feedback.vertical ) .addClass( feedback.horizontal ) .appendTo( this); } } });})(jQuery);
在这段代码中,#commentform是jQuery将显示工具提示的选择器,.tooltip也是我们定义工具提示位置的内容部分。
现在最后一步是在wpb-tooltip.css文件中添加一些CSS 。只需复制并粘贴以下代码:
.ui-tooltip, .arrow:after { background: #356aa0; border: 2pxsolidwhite; } .ui-tooltip { padding: 10px20px; color: white; border-radius: 20px; font: bold14px"Helvetica Neue", Sans-Serif; text-transform: uppercase; box-shadow: 007px#356aa0; max-width:350px; } .arrow { width: 70px; height: 16px; overflow: hidden; position: absolute; left: 50%; margin-left: -35px; bottom: -16px; } .arrow.top{ top: -16px; bottom: auto; } .arrow.left{ left: 20%; } .arrow:after { content: ""; position: absolute; left: 20px; top: -20px; width: 25px; height: 25px; box-shadow: 6px5px9px-9px#356aa0; -webkit-transform: rotate(45deg); -moz-transform: rotate(45deg); -ms-transform: rotate(45deg); -o-transform: rotate(45deg); tranform: rotate(45deg); } .arrow.top:after { bottom: -20px; top: auto; }
可以随意修改此CSS文件以满足您的需求。
就这样。现在,您已经成功创建了一个插件,可以在WordPress注释表单中添加jQuery工具提示。您需要做的就是使用FTP客户端(如Filezilla )将wpb-comment-tooltips文件夹从桌面上传到/wp-content/plugins/Web服务器上的目录。上传插件后,转到WordPress管理区域中的“插件”页面并激活插件。
我们希望本教程可以帮助您学习如何在WordPress注释表单中添加jQuery工具提示。我们建议您修改此代码,并尝试在其他地方添加工具提示。
相关内容